Official controller checks
Use the exact controller manual before buying or changing settings. These official tools help validate PV voltage, current, wiring, and setup assumptions.
Pre-arrival checks
Before checkout
Confirm PV input voltage, battery voltage, output current, chemistry settings, ventilation, wire route, fusing, disconnects, and monitoring path.
Must read before you buy a controller
If the controller purchase is part of a roof build, read the RV solar installation guide before checkout. Controller size and placement should follow the real panel layout, cable entry, wire route, fusing, disconnects, and commissioning plan.
The charge controller is not an accessory
When people price out an RV solar system, the charge controller can look like a line item you buy once the more exciting pieces are chosen. Panels feel visible. Batteries feel important. Inverters look powerful. The controller, by comparison, seems like a box that simply has to exist.
In practice, it does much more than that.
The charge controller is the device that turns raw panel output into controlled battery charging. It regulates voltage, manages charging stages, and keeps the battery from being fed in a sloppy or damaging way. If the controller is wrong for the system, you can end up with weak harvest, slow charging, inconsistent battery behavior, or settings that never quite match the chemistry you paid for.
That is why controller choice belongs near the beginning of the design process, not the end.
If you already know you want MPPT and are comparing exact 30A and 40A models, use the best MPPT charge controller buyer guide after you finish the sizing and wiring checks below.
What an RV solar charge controller actually does
At a basic level, the controller sits between the solar array and the battery bank. Panels produce power according to sunlight, temperature, shading, and system layout. Batteries, meanwhile, want charging delivered within specific limits.
The controller's job is to bridge those worlds by:
- accepting power from the panels
- converting or regulating that power into usable battery charging
- moving through charging stages such as bulk, absorption, and float
- protecting the battery from overcharging
- sometimes supporting monitoring, temperature compensation, and load control
That last part matters more than many beginners expect. Batteries are not just big empty buckets. Different chemistries want different voltage targets, different charging behavior, and different low-temperature protection strategies.
PWM vs. MPPT for RV solar
Most RV solar shoppers eventually land on the same question: should the system use PWM or MPPT?
The short answer is that both can work, but they solve different kinds of systems.
PWM controllers
PWM stands for pulse-width modulation. These controllers are usually simpler and less expensive. They tend to fit smaller systems where panel voltage is already closely matched to the battery bank and where cost control matters more than squeezing out every bit of performance.
PWM can make sense when:
- the array is small
- panel voltage is a close fit for the battery bank
- the wiring layout is simple
- budget matters more than expansion flexibility
The weakness is that PWM gives you less room to optimize around higher panel voltage. That can limit design freedom and usually means less efficient use of available panel output.
MPPT controllers
MPPT stands for maximum power point tracking. These controllers are more sophisticated and are often the better fit for RVers who want a cleaner, more capable system.
MPPT can make sense when:
- the array is moderate to large
- the roof layout pushes you toward series strings or higher-voltage input
- you want more charging performance in variable conditions
- expansion and wiring flexibility matter
MPPT controllers can usually take higher panel voltage and convert it more effectively into battery charging. That flexibility becomes especially useful when roof space is awkward, cable runs need to stay tidy, or the system may grow later.
Compare
PWM vs. MPPT controller fit
Use one comparison matrix to scan the practical differences. Small screens stack each row; wider screens keep the first column pinned.
| Spec | PWM controller | MPPT controller | What to verify |
|---|---|---|---|
| Best system size | Small, simple, low-cost arrays | Moderate to larger arrays or expandable systems | Total panel watts, battery voltage, and future roof capacity |
| Panel voltage flexibility | Best when panel voltage closely matches battery needs | Better for higher-voltage array layouts | Open-circuit voltage in cold conditions and controller PV input limit |
| Shade and layout | Simple when the array is small and uncomplicated | More flexible with series, parallel, or hybrid layouts | Roof obstacles, shade pattern, and controller headroom |
| Battery settings | May be more limited on cheaper units | Usually more configurable | Exact lithium, AGM, or flooded profile requirements |
| When to skip | If the roof array may grow or wiring needs higher voltage | If the system is tiny and the extra cost buys no practical benefit | Whether the controller solves the real bottleneck |
Do not compare controllers by price alone
A cheaper controller is not necessarily the cheaper system. If an MPPT controller lets you use a cleaner wiring layout, reduce voltage drop pressure, and get better real-world harvest from the same panels, it may save frustration and redesign later.
Start sizing with system voltage and array plan
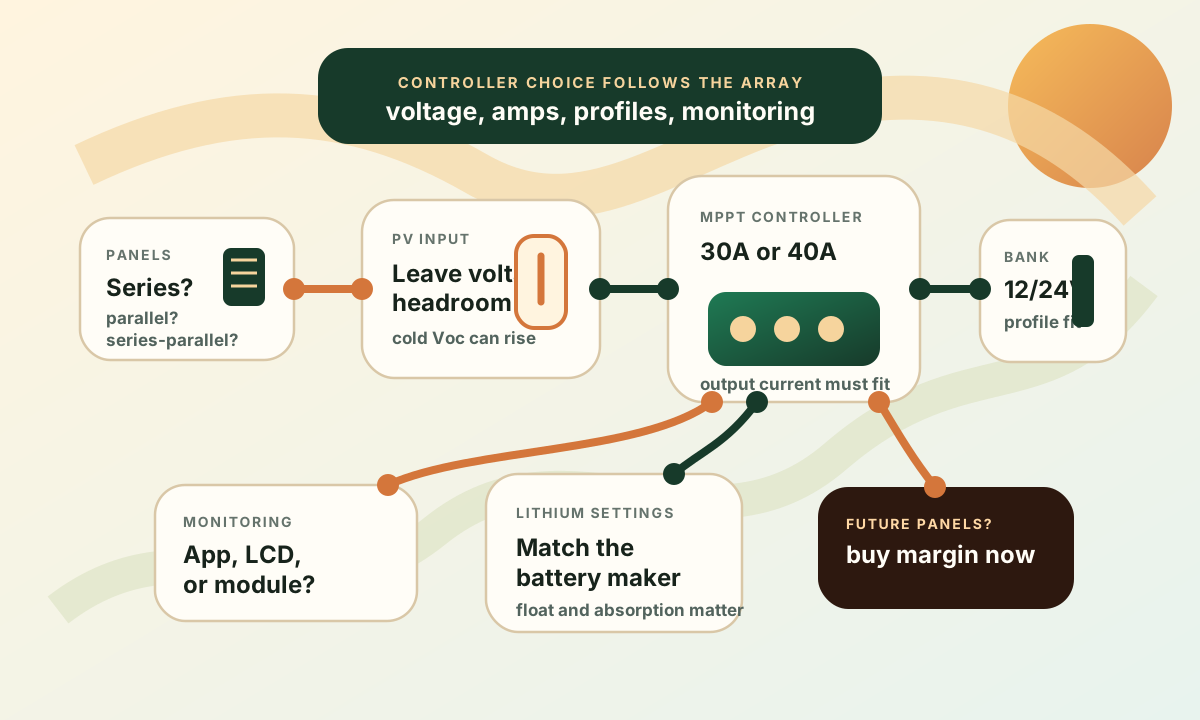
A controller is not sized in a vacuum. It has to fit the battery bank voltage, the solar array's open-circuit characteristics, and the current the system may deliver under good conditions.
That means you usually need these answers first:
- Is the battery bank 12V or 24V?
- How much total solar wattage is planned?
- Are the panels wired in series, parallel, or a hybrid layout?
- What is the array's open-circuit voltage in cold conditions?
- How much controller output current could the battery side see?
If those answers are still fuzzy, it is too early to buy the controller.
Controller amperage matters
One of the most common mistakes is choosing a controller based only on advertised panel wattage or a recommendation copied from another rig. A controller also needs enough output amperage for the battery-side charging current the array can realistically produce.
In practical terms, more panel power and lower battery voltage usually mean more current on the battery side. That is why a system that seems modest on paper can still require a more capable controller than expected.
It is also smart to leave breathing room. If the controller is always living at the edge of its limit, the system has less flexibility for bright conditions, future expansion, or seasonal variation.
Why array voltage changes the conversation
Solar design in RVs is usually limited by roof geometry, shade, and cable routing. That is why controller input voltage matters so much. Higher-voltage array layouts can simplify some wiring decisions, but only if the controller is built to accept them safely.
The important checks are:
- maximum input voltage
- expected open-circuit voltage of the array
- cold-weather voltage rise
- whether the controller supports the planned string layout
This is where series-vs-parallel decisions and controller choice overlap. A layout that looks elegant on paper can become a bad idea quickly if the controller input limit is ignored. The full wiring tradeoff is covered in How to Wire RV Solar in Series vs. Parallel.
Placement can improve or ruin a clean install
Even a correctly sized controller can behave poorly in a sloppy layout. Placement affects voltage drop, serviceability, and how easy it is to understand the system later.
Good controller placement usually means:
- closer to the battery bank than the roof entry point
- dry and ventilated
- easy to inspect without dismantling half the coach
- short, practical battery-side cable runs
- enough room for clean cable bends and overcurrent protection
Poor placement usually creates:
- longer battery-side cable runs
- cramped compartments
- unnecessary heat
- confusing service access
If the controller is tucked into a space that is convenient only on install day, the system becomes harder to live with every month after that.
Settings matter more once you switch battery chemistry
One reason controller choice matters is that modern battery chemistries are less forgiving of lazy setup. If you move from older lead-acid assumptions to lithium, controller settings can no longer be treated like factory defaults that are probably close enough.
Look closely at:
- bulk or absorption voltage
- absorption duration if configurable
- float behavior
- temperature compensation behavior
- low-temperature charging protection or communication support if available
Lithium systems in particular may want different logic than flooded or AGM setups. Some RVers assume the battery's internal protections make controller setup unimportant. That is a risky way to think. Battery protections are there to stop bad outcomes, not to replace good charging behavior.
Temperature and environment are part of controller selection
Controllers live in real RV environments, not lab benches. Summer heat, shoulder-season mornings, cabinet airflow, dust, vibration, and imperfect mounting all matter.
If the controller runs hot, it may reduce performance or simply live a harder life over time. That is why it is worth checking:
- cooling requirements
- mounting orientation guidance
- enclosure rating
- cable terminal access
- how the display or app behaves in actual use
These details do not usually decide which controller is best in a review roundup, but they absolutely shape whether the install feels solid six months later.
Do not bury a controller in a sealed compartment
Controllers need room to breathe. A hidden, cramped, heat-soaked install can turn a perfectly reasonable product into an unreliable one.
When a smaller controller is actually the wrong savings move
Some systems can technically be paired with more than one controller size. That creates the temptation to choose the smaller unit, especially if it keeps the price down.
That can work when:
- the array is truly fixed and small
- there is no expansion plan
- charging goals are modest
- the system is used lightly
It is usually the wrong call when:
- the roof still has open panel space
- the battery bank may grow
- remote work or shoulder-season travel are likely
- the rig spends time in imperfect solar conditions
A controller upgrade later can mean rewiring, replacing hardware, and rethinking cable routes. If the system is likely to evolve, buying the controller only for today's minimum can create tomorrow's avoidable project.
Signs your existing controller may be mismatched
If you already have solar installed, a few patterns can suggest the controller deserves a closer look:
- the array should be producing more than it does in good sun
- charging feels inconsistent even after wiring checks
- the controller is frequently near its limit
- settings do not match the battery manufacturer's guidance
- the system layout has changed but the controller never did
These symptoms do not always mean the controller is wrong, but they often point to a design review that starts there.
A better buying mindset for RVers
The best controller is rarely the one with the most features on a spec sheet. It is the one that matches the electrical plan, the battery chemistry, the real roof layout, and the way the rig is used.
That usually means asking:
- Does the controller fit the system I am actually building?
- Will it support clean wiring and practical placement?
- Are the charging settings clear and adjustable enough?
- Does it leave room for likely growth?
- Will I understand and trust it on the road?
When those answers are solid, the controller disappears into the system in the best possible way. It does not need daily attention because it is doing its job correctly.
If the controller appears to be awake but the bank is not recovering, use the RV solar not working troubleshooting guide to separate weak panel input, controller settings, battery-side disconnects, and loads that are outrunning solar harvest. If the bank fails to recover from every charging source, switch to the RV battery not charging troubleshooting guide.
Frequently asked
Questions RVers usually ask next.
Is MPPT always better than PWM for an RV?
Not always, but it is often the better long-term fit. Small and simple systems can still work well with PWM, especially when panel voltage closely matches the battery bank. MPPT becomes more attractive as array size, wiring complexity, or expansion flexibility increase.
Can I choose a controller before I finalize panel wiring?
It is better to finalize the array plan first. Series and parallel decisions affect controller input voltage, current expectations, and overall design flexibility. Buying the controller too early can box you into a weaker layout.
Does lithium battery protection mean controller settings do not matter?
No. Internal protections are a backstop, not a substitute for proper charging settings. The controller should still be configured for the battery chemistry you are running.
Should the controller be mounted near the roof entry point?
Usually not if that creates a longer battery-side run. In many RV systems, it is more important for the controller to live closer to the battery bank in a dry, ventilated, serviceable location.
Freshness note
Last checked April 17, 2026
This topic can change when products, plans, prices, campsite rules, or fit guidance move. These notes show what was reviewed most recently.
This review included
- Verified MPPT vs PWM efficiency claims, sizing recommendations, and compatibility notes from Victron, Renogy, and EPEVER documentation.
- Checked current pricing for recommended controllers.
Recent change log
April 21, 2026
Added a pre-purchase installation callout so controller sizing is tied to the actual roof layout, cable route, and commissioning sequence.
April 17, 2026
Published RV solar charge controller guide with verified efficiency data and current pricing.
Broader editorial corrections are tracked on the Corrections and Updates page.


